The masks contain buttons by means of which you can initiate actions. In this case, a distinction needs to be made between buttons which are specific to the mask you are working with, and buttons which trigger the same action regardless of the mask.
The following figure illustrates some basic buttons:
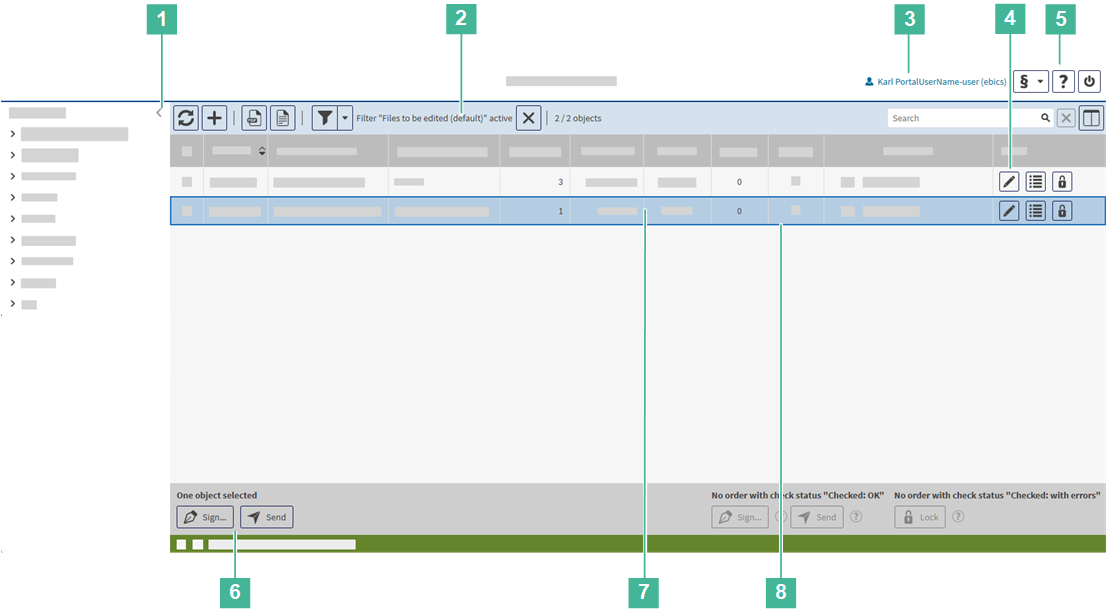
Explanation of the field names


The following applies to buttons:
The following table contains a description of the standard buttons:
|
Button |
Description |
||||||||
|
Cancel |
Cancels the current activity; it may be necessary to confirm a warning message Entered data is not saved. |
||||||||
|
Save |
Validates and saves the input |
||||||||
|
Continue |
Calls up the next mask |
||||||||
|
Back |
Changes to the previous mask or closes a window opened in the foreground Always use this button instead of the corresponding browser button to switch back to the previous mask. Otherwise, errors may occur, for example when completing activities or business transactions. |
||||||||

|
Updates the mask's data |
||||||||

|
Generates a PDF from the displayed data |
||||||||

|
Generates a CSV file from the displayed data |
||||||||


|
Use this button to define whether the mask output is to be filtered. The elements have the following function:
Details on the filter configuration can be found in the section Applying filters to list output. |
||||||||

|
Opens a pop-up window in which you configure the column display of the current list For each column you can choose whether it shall be displayed and at which position (via drag and drop). Details on the column configuration can be found in the section Configuring list columns. |
||||||||

|
Opens the page of the user help |
||||||||

|
Logs out the currently logged in user |
||||||||
|
Buttons initiating actions related to data records Detailed information on the functions of a button within the context of the related mask can be found in the use cases. |
|||||||||

|
In the list header: navigates to the first data record |
||||||||

|
In the list header: navigates to the previous data record |
||||||||

|
In the list header: navigates to the next data record |
||||||||

|
In the list header: navigates to the last data record |
||||||||

|
|||||||||

|
In linked lists: moves the selected list elements from the left-hand list to the right-hand list |
||||||||

|
Creates a new object |
||||||||

|
Opens a selection list with alternatives for creating a new object |
||||||||

|
|||||||||

|
|||||||||

|
Saves the entered data |
||||||||

|
Discards the changes and switches to the view mode |
||||||||

|
Discards the last entered change in a linked list You can select this button multiple times to cancel the respectively latest editing step. Note: Section Working with linked lists describes how to work with two-column lists. |
||||||||

|
Repeats the transfer (for example, for failed transfers) |
||||||||

|
Duplicates the displayed data record and, depending on the context, opens |
||||||||

|
Downloads data |
||||||||
|
|
Activates and deactivates functions |
||||||||
|
Buttons for sorting lists |
|||||||||
|
|
Activates the natural sorting in descending order Natural sorting is the logical sorting depending on the field type, for example text fields by the alphabet, date fields by the date or numerical data by the value. If this type of sorting is activated, the newest elements or the elements with the highest values are sorted to the top of the list. Note: Columns that correlate by content are also sorted together. If, for example, you have defined account attributes, the lists are first sorted by order of the defined account attributes and then by order of the assigned values. |
||||||||
|
|
Activates the natural sorting in ascending order Natural sorting is the logical sorting depending on the field type, for example text fields by the alphabet, date fields by the date or numerical data by the value. If this type of sorting is activated, the oldest elements or the elements with the lowest values are sorted to the top of the list. Note: Columns that correlate by content are also sorted together. If, for example, you have defined account attributes, the lists are first sorted by order of the defined account attributes and then by order of the assigned values. |
||||||||


 (The function is activated)
 (The function is deactivated)
